Monday, December 20, 2010

Light the Candles


There are only 5 days left until Christmas and I am still making gifts. (Please tell me I am not the only one!) If you need a last minute gift, why not make a personalized candle? First get a candle in any size. Then find an image on your computer that you like. I chose to do initials and then used some clipart. Cut a piece of tissue paper the same size as a piece of printer paper. Attach the tissue paper to the paper using repositionable adhesive. You just need a little bit at the top and bottom to keep your paper in place. Then run it through your printer. (It works!) Carefully peel the tissue paper off and use some of the same repositionable adhesive to wrap it around the candle. You need to leave a little candle showing at the top and then the bottom so you might need to trim the paper. Then use your heat tool and heat up the paper. I start at the image so it lays flat. What it does is actually heat up the wax and it soaks through your paper. Make sure to get the edges and the seam in the back to lay flat. Don't be afraid to touch the paper and get out the bubbles.
To do the Twilight candles, I used some stamps from The Greeting Farm. Instead of running the tissue paper through my printer, I used Staz-On ink in black and stamped directly onto the paper. Then I heated it onto the candle the same way.
These are both gifts so I wrapped them in clear wrap that I tied with a bow and some extra embellishments that are on sale right now. So don't put it off anymore - get it done!

Monday, November 29, 2010

Holiday Treats


The last challenge for The Greeting Farm blog hop was to create a goodie or treat in a card. I have seen many ideas using an easel card so that is what I made for this. First, I cut out an 8 1/2 by 4 1/4 inch piece of red cardstock. I then scored this at 4 1/4 and 2 1/8. This folds over to make the easel. For the main part of the outside, I cut another piece of red cardstock at 4 1/4 by 4 1/4. Then I covered this with some patterened paper. I used the Dahlia stamp because she is so festive! I colored her with red and green to match the paper and the candy. I attached the square to the front of the card and added some red glitter to the red stripes and some red glitter to Dahlia's flower. To hold the easel in place, I used a clear button and then stuck the candy onto the button. This way, once the candy is gone, the card can still be displayed. So sweet!

Let It Snow


Here is another card challenge using stamps from The Greeting Farm. The challenge was to create a snow card. I really wanted to use the Camille and Edward stamps inspired by "Twilight." (There was a snow scene in one of the movies! ) I made a 5 inch by 5 inch white card. Then I covered it with some snowflake paper I think I have had since I started scrapbooking. I wrapped the paper in some blue gray fibers that I attached to the back with double sided tape. After coloring my characters and cutting them out, I attached them using pop dots. The final touch was adding glitter to Edward and adding the saying, "I'm snow happy with you!" Now, which "Twilight" friend should I give this card to?

Saturday, November 27, 2010

Santa, Baby


For my Christmas cards this year, I wanted to use Cheeky Rockabilly from The Greeting Farm as soon as I saw her. I liked her old-fashioned look and her flirty style. I stamped her and then colored and cut her out. (Thanks to my sister Joy for helping me to color. There were lots to do!)To make her perfect for Christmas, I cut out Santa Claus' hats from Paper Doll Dress Up. I added a white pom pom and some cotton to the hat. The background paper is from Hobby Lobby. I searched everywhere for a Naughty or Nice stamp and came up with nothing. Then, at Hobby Lobby, I found this, "Turn on the Twinkle." Perfect! I embossed some red glittery embossing powder using this stamp. I hope she brings some flirty fun to my friends and family this Christmas!

Sunday, November 21, 2010

Farm Fresh Fridays


Sunday already? Hard to believe that Thanksgiving is this week. I cannot wait until my house smells like Thanksgiving dinner!
Here is a challenge from The Greeting Farm. I had to create a Sparkly Birthday card. I love butteflies so I used Flutter Anya. After coloring her with markers and colored pencils, I glued some pink glitter to her wings. Then I cut out some more butterflies and the word, "smile" using Walk in my Garden. To keep the sparkly theme, I added some clear seed beads to the butteflies and the "i" in smile using some double sided tape. It looks like all of these butteflies might just fly right off the card. Enjoy your week!

Friday, November 19, 2010

Greeting Farm Challenge


I have to admit, I used to think using sketches for my scrapbook pages was stealing someone else' ideas. Now, I see how they can spark my creativity and get me out of my rut. In the past two days, I have made two pages with pictures I have had sitting in a box for two years. Sketches are good!

This sketch was found on The Greeting Farm blog for a challenge. I used some American Crafts patterned paper called, "Merrymint." This paper is the main background and also frames the pictures. I used the Plantin Schoolbook Cricut cartridge to cut the scallop around the solid red cardstock. To make the green circle, I just traced a tupperware bowl. The stamp is from The Greeting Farm. She is Dahlia. I colored her Christmas colors to match the gingerbread house that Kate is making. I edged the circle in red and attached it using pop dots. Then I cut out, "SWEET" using the same patterned paper. The challenge had journaling under the title, so I handwrote a little bit about the picture. Let's see what sketches I can find next!

Wednesday, November 17, 2010

Peachy Keen Stamps: Mini Challenge


Here is a quick design challenge using some Peachy Keen Stamps. The challenge was to create a project using the Peachy Keen Face stamps with polka dots. The main color had to be white. I have had these pictures of Kate playing in the snow for two years so I just had to use them. Of course, I had no polka dot paper that matched so I took a piece of textured white cardstock and a polka dot mask. I colored in the dots with pink chalk. Then I cut out some snowflakes and circles on my Cricut machine. I added faces to the circles and I put each circle in the middle of the large flakes. You cannot really tell but I added a little pink chalk to each face. Then I also cut out "SNOW GIRL" and added that to the page. (I was having some camera difficulties tonight so the picture is not that great!) I was happy to finally use these pictures.
I hope to play in the snow again soon.

Saturday, November 13, 2010

Peachy Keen Stamps: Challenge 40


Brrr! It is finally getting cold here in the Valley of the Sun. Now cold to us is in the 70's so don't laugh too hard! Even though I live in Arizona, I am a big Packers' fan and I was so excited to do this card using a stamp from Peachy Keen Stamps. For this challenge, I had to follow a sketch and use some stamps from Peachy Keen. I first made a green card and then used some patterned paper from Basic Grey. I topped the paper with a strip of white cut with some mini-scallop scissors. (I have not used these scissors in so long!) To add some texture to the green paper, I embossed some footballs using a clear embossing powder. Then I stamped the Packer Snowman and colored him in with markers. For the ribbon, I used some holiday ribbon I probably bought for Easter but goes great with these colors. I put the snowman on the top with some pop dots. To cheer on the team, I stamped those famous words, "Go Pack Go!" and attached that to the bottom. Here's to a great rest of the season!

Sunday, November 7, 2010

Sunday, Sunday, Sunday!


I absolutely love Sundays! It is a time to get everything done and it is also time for FOOTBALL! I love football. My friend Mary also loves football, but more importantly, she loves the New England Patriots and Tom Brady. While I don't share in this love, I did want Mary to know how much I care about her so I made her this football card for her birthday. I used the Quarterback Ian stamp from The Greeting Farm and colored him with the Patriots' colors. Then I cut him out. I attached a piece of red Felt Fusion from Queen and Co. The felt was self-adhesive and easy to stick to the blue cardstock. (I have had this for a few years and I was surprised that it was still sticky!) I put "Little Tommy" over the felt with some pop dots and then attached some silver star brads to the right. I hope Mary had a fabulous birthday and enjoyed her "Little Tommy." Have a great Sunday!

Saturday, October 30, 2010

Sweet & Toxic


My friend Mandy has a birthday on October 28th so it is no surprise that she LOVES Halloween. Every year, she throws a huge Halloween party that I hear is wonderful. (Too bad I live 2000 miles away.) This year, I sent her this card made with the Sweet & Toxic stamp set from The Greeting Farm. I stamped the girl using Staz-On ink so I could color her with markers and they would not bleed. Then I used the skull stamp with some VersaMark ink and stamped this all over a black piece of cardstock. I used some clear embossing powder from Stampin' Up and heated them up. They were shiny when they dried. I layered these pieces with some other pink and black pieces. I had some skull brads that I added to the corner. Finally, I printed out the greeting on my computer. She is wicked and cute all at the same time. Kind of like Mandy!! Happy Birthday!

Sunday, October 24, 2010

Wedding Rings


Here is a quick card made for a wedding. I cut out two 3 1/2 inch circles from Plantin Schoolbook with gold paper. Then I glued them onto the patterned paper. To add the bling, I cut out a small triangle that I first covered with double sided tape. Then I also added some 3 in 1 glue to make it extra sticky. I covered the glue with white seed beads for a sparkly diamond. Enjoy this week before Halloween!

Sunday, October 10, 2010

Spooky and Cute


One of the best things about Halloween is all of the cute stuff. Here are some digital stamps I found at The Greeting Farm. A digital stamp is basically a download that you can use again and again. I printed these out on some cardstock and colored them in with markers and colored pencils. I attached them to some tags for some Halloween goodie bags. (I honestly have no clue why some of them are sideways. I have tried resaving them but no luck. I wanted to show them to you so you have time to order them before Halloween.) Let the spooks begin!

Saturday, October 9, 2010

Pumpkins

Here is a video to make a 3-dimensional pumpkin card. Enjoy!

http://www.youtube.com/watch?v=2gPPQdrSo2A

Friday, October 8, 2010

Happy Birthday!


Happy Birthday to my Aunt Lil! To celebrate, I made this card using Flirty Anya from The Greeting Farm. (They have the cutest stamps!) I colored her with markers and then cut her out. I put her on the polka dot paper and used a stamp from Stampin' Up that I punched out. The strips of ribbon at the top and the bottom just added a little something to the card. Enjoy this beautiful fall weekend!

Tuesday, October 5, 2010

Ahoy!


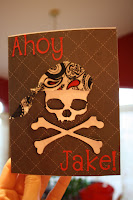
Last weekend, two little pirates turned five years old! Jack and Jake had a pirate themed birthday party so I had to do some pirate cards!! What to do for these swash bucklers?? I got out my Indie Art cartridge that I have rarely used because I remembered it had this skull and crossbones on it. First, I traced each shape with the Cricut markers. Then, I cut them out with the cutting blade. This is really simple to do.
Replace your blade with a marker and choose your design. Hit Cut and it traces the design. Then, without touching any buttons, change the marker back to the blade. Then hit Load Paper. (I know, it is already loaded but this puts the page in the exact place to start cutting.) Then hit Repeat and Cut. To add to the pirates, I cut out some fabric for their bandanas. Ahoy Mateys!

Sunday, September 12, 2010

A Little of Both


Long before scrapbooking, I used to cross stitch. I would cross stitch everything - bookmarks, bags, wall hangings, gifts, etc. I loved it but some of my projects would take forever. I was excited to find a project that combined my love of cross stitching with my obsession of scrapbooking. There is a book by Leisure Arts called Smirk by Kyla May. I made the "You're Always There For Me" Clipboard for my friend Katie. First, I cross stitched the two girls and the cute saying on 14 count white aida cloth. Then I cut a piece of transparency and attached it to the top of my design using brads in the upper corners. To make the rest of the clipboard, I covered it in cute paper and then wrapped ribbon and threads around it. I attached these to the back using double sided tape and masking tape. Then I printed out sayings about friends and attached it to the ribbons using little clothespins and paper clips. Katie can add her own pictures to the other paper clips. The book is full of projects just like this. Have a great week!

Monday, September 6, 2010

Why Thank You!


Writing thank you notes has become something of a lost art. We get gifts from friends and family and we always mean to tell them, "Thanks," but then life gets in the way and we forget. I always try to send thank you notes, whether it is to the children in my classroom for their homemade gifts or to my friends and family for all that they do for me. Here is a thank you note that I made for everyone who sent me goodies for my birthday. I started with a basic white 4 in. by 5.5 in. card that I covered with some pink paper. Then I used some black ink and this Kiki La Rue stamp called Cupcake Kiki. (I have been baking lots of cupcakes lately so I thought this would all go well together.) I colored her with some colored pencils and cut her out. Then I inked the edges with some pink ink and put some glitter on the cupcake. I attached her to the card. Then, since I made many of these, I printed out "Thank you!" on my computer with a fun font called "Oh Photoshoot." Then I attached the sentiment with some pop dots. The next time you get a gift, take the time to send a thank you. Your friends and family will feel like they got a gift too!

Thursday, August 19, 2010

Summer?


Where did this summer go? I had such big plans to make so many projects and keep this blog busy. Now school has started again and my days are filled with 3rd graders. Not much time for scrapbooking! My goal this school year is to find more balance with work and play so here goes.
A good friend of the families' daughter is getting married soon and we were invited to her wedding shower. I went to Michael's and found this wooden frame that measures 12 by 12. First, I painted the edges green and then I used some embellished daisy paper by K & Company. The paper is an off white and the daisies are raised on it to give it some texture. I have had this paper forever so I was glad to finally use it. When I went to cut out the rectangle for the picture, I did not measure correctly. The glass does not come out of the frame so I had to measure and cut and estimate where it would fit. It did not turn out perfectly so I ended up painting green around the picture area and then glued the paper on. I like how it will frame their picture. Then I took some yellow chalk and highlighted the middle of each daisy. I had an extra sheet of this paper so I cut out some more daisies and used some pop dots to glue them to the corners. Finally, I found a quote about love that I printed and matted with some yellow cardstock. I hope the bride likes it and finds a perfect picture to put inside. Here is to taking the time to stop and smell the flowers! Have a great week!

Sunday, June 27, 2010

My 100th Post!


It is hard to believe but this is my 100th post! I had no idea I had created so many things. Thanks to all of you who keep checking in and for posting those great comments.
Here are three cards I have made recently. The peace card is for a one year old's first birthday party. The theme was, "Peace, Love, and Brayden." I could not find a peace symbol on any cartridge, so I made this using George. I cut out a circle and several rectangles and pieced it all together. I covered it with blue seed beads using 3 in 1 glue, although tacky tape also works. The stamp is from Fiskars.
For Father's Day, I used Everyday Paper Dolls for this Top Chef. On the face, I used a stamp from Peachy Keen Stamps. The Top Chef is printed from my computer.
Finally, it was my little sister's birthday. She is very fashionable, so I used the new Summer in Paris cartridge to cut out this shoe. First, I cut out the solid shoe in blue then I cut out the fancy shoe in a shimmery paper from My Mind's Eye. The words at the bottom are also printed from my computer.
I hope everyone is enjoying their summer. Happy 4th of July next weekend!

Friday, May 28, 2010

Autographs Anyone?


Happy Friday to all of you! My good buddies Kate and Drew are heading to Disneyworld next month. I know how kids love to get autographs from all of their favorite characters so I made each of them their own autograph books. First, I cut some chipboard 6 by 8 inches and covered each side with paper. For Kate, I chose pink to match the princess castle on the front. For Drew, I chose black and red to go with the Mickey and Minnie stickers I found. Then I cut out some beige cardstock that I put inside the book. I cut out 20 pages for each of them so they have plenty of room for autographs and can even add pictures to it later. To make the books, I used my Bind-It-All machine. On the back covers, I cut out a Mickey Mouse head with their initials using my Mickey Font cartridge. (This is how I personalized the covers too.) The final touch is a retractable Sharpie marker that I tied to the binding with rope. This way, they never have to search for markers and they will not lose the caps. Now they are ready! Have a great Memorial Day weekend! Thanks to all of those who protect us every day!

Wednesday, May 26, 2010

Summer Birthdays


Since school is out for summer (woo hoo!) I will not see some of my teacher friends for their birthdays. So they would not think I forgot about them, I gave them their cards last week before school was out.

Since Alicia has a puppy named Marlely who she loves so much, I made her this card using the Puppy Kiki stamp from Kiki La Rue. I found the stamp at Crop Girls. I used some brown ink and then colored it in using colored pencils. The saying at the bottom is from a Fiskars stamp set using Stampin' Up ink in Pink Passion.
For Adam, I cut out a cupcake using the Celebrations cartridge with my Cricut. To add texture, I glued on seed beads in a variety of colors. First, I added wet glue to the top of my cupcake in various places and then I sprinkled on the beads. The beads went everywhere so make sure to be careful when you do this.
Happy June Birthdays Alicia and Adam!

Saturday, May 15, 2010

Happy Birthday Mom!


This post is a little bit late. Last weekend was my mom's birthday and Mother's Day. Here are the cards my sisters and I made for her for her birthday. (Sorry for the horrible pics, but I obviously was giggling or something because nothing is in focus.) I told my sisters I would post them. We always are in a competition about who makes the best cards. It is a friendly competition, of course. I will not tell you which one is mine but I think they are all cute and my mom loved them!

Saturday, May 1, 2010

Happy Birthday Sonja!


My cousin Sonja turned 40 this week so her family is having a surprise party for her today. She is very young at heart so I made her a fun loving card. I decided to use the colors and inspiration from the Peachy Keen Stamps Challenge. They give you a color palette and you use those to make a card. I cut out the flowers using Walk in My Garden with my Cricut. Then I used the Everyday Character Face stamps to give them each a smile. Sonja always makes me smile so these cute faces fit her perfectly.

Sunday, April 11, 2010

Bed and Breakfast


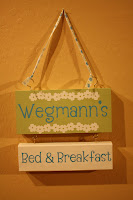
A few months ago, my two sisters and I decided to take a trip back East to visit Boston and New York. One of my best friends, Mary, and her husband Jim live near Boston. When I told her we were coming for a visit, she insisted that we stay with her. All three of us?! They opened their beautiful home to us. Mary had fresh cut flowers in each of our bedrooms. She had a chocolate bar downstairs with all kinds of goodies. They even made us a traditional New England dinner complete with fresh lobsters and steamed clams. Yum! What to do for the Wegmann family? The upstairs bathroom that my sisters and I used, had lots of greens and blues in it so I made them this sign to hang up. I used two pieces of wood that hooked together because I did not want to smoosh all of the writing together. There are hooks so the bottom piece can be taken off. It is hung with a ribbon. I hope they enjoy this gift as much as we enjoyed our time in their home. Thanks Mary and Jim!

Wednesday, April 7, 2010

Glimmer


Do you like things that sparkle? I do, but without the glittery mess. I recently discovered Glimmer Mist. It comes in lots of different shimmery colors. Basically, it is a water based spray that adds a little bit of shine to your cards and other crafty things. Well, I took this flower idea from another website and tweaked it to make it my own. First, I cut out eight scalloped circles out of vellum and sprayed them with Viva Pink Glimmer Mist. They instantly curled up but I did not fret. I got out my heat tool and they flattened back out and dried. Then I cut another scalloped circle out of some pink cardstock. I folded each piece of vellum three times and made the petals of the flower. Using double sided tape, I taped each one into place onto the pink scalloped circle. For the middle, I simply glued on a button. When I was little, I used to take ribbons and yarn and tie them into knots to make different things. (Don't worry, therapy is helping!) So I had this shimmery green ribbon and began to tie it into knots. It made a cute stem with leaves. I glued a piece of cardstock onto a white card and glued my flower into place. This was a thank you card for a very special friend. Spray and be glimmery. (I bought my Glimmer Mist at Crop Girls.)

Tuesday, March 23, 2010

Pretty in Pink


Are you having a flashback to the 80s right now? "Pretty in Pink" is one of my mom's all time favorite movies. Go out and rent it if you have not seen it. But, the pretty in pink I am talking about is the pink for breast cancer research. Some of my friends at work are doing a breast cancer walk and they have to raise a TON of money so I donated some pink frames for them to sell. Each one I did is just a basic Michael's wooden frame. I painted the edges a light pink. Then I used some 3 in 1 wet glue to adhere a piece of paper to the front side. I used an exacto knife to cut out the middle. Then I just added some words and embellishments. These are just a few of them. I believe they are selling them for $10 a piece. I can make one for you too and donate the money to their great cause. Pink never looked so good!