Wednesday, June 13, 2012

Saturday, May 12, 2012

The X Factor

 What better way to celebrate Mother's Day weekend than with a baby shower?  Here are a few gifts I made for our friends Holli and Ryan. They are expecting "The X Factor" any day now. Big Brother Ben is very excited too! For the onesie, I used the Create a Critter cartridge. For the card, I used the Mickey Font, and for the sign I used George and got the quote off of the internet.  They can add pictures to the sign once he arrives.  So much fun to make and such a fun family!  Congrats!

Sunday, April 22, 2012

First Communion

Today is a very special day for Kate.  It is her first communion.  Since I cannot be there in person, I wanted to make her a special card.  I used the Indie Art cartridge and found this layered cross.  I kept the two pieces together since I thought it added some texture. Then I glued lots of Prima purple flowers on the bottom.  (I made a similar card as a thank you to CCV for donating supplies to our school.)  I will be thinking about Kate on this very special day.

Saturday, April 7, 2012

Happy Hello

 Happy Easter weekend everyone!  Hope your weekend is filled with family, friends, and chocolate eggs!

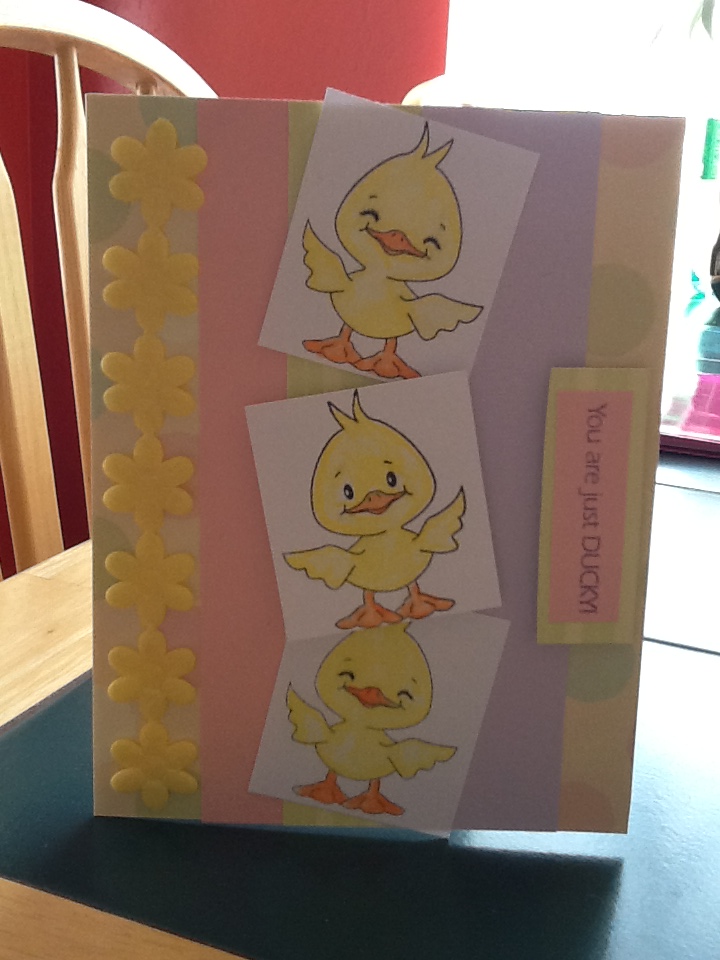
For Easter, I created a few cards with digital stamp from Tiddly Inks.  This is their Wryn character and she is just adorable.  I colored her with Prismacolor pencils.  Then I just layered some papers under her.  I wanted the stamp to be the main focus of the card.  The "happy hello" sentiment is from a Fiskar's stamp set and I thought it fit perfectly.

Enjoy!

Monday, March 19, 2012

Bunny Hole

 A few weeks ago, I was spending some quality time on Pinterest when I saw a cute bunny card.  I decided to try to make a similar card.  First I cut out the bunny using my Create a Critter cartridge.  I cut out an extra bottom layer in brown to create his backside - the cutest part!  The brown paper is supposed to look like wood so after I cut a large hole in it, I crumpled it up and added some brown ink.  (The original card I saw had a wood Cuttlebug piece and it really looked like wood.)  I glued the bunny looking into the card and added his cottontail with some cotton.  The stamp is one of those dollar bin stamps I got at Michael's that I attached to the front.  Now this card will be fun on the front and on the inside.  Happy Easter!

Sunday, March 18, 2012

The Pink Elephant - TPE 139

Can you tell I really do not want to get ready to go back to work tomorrow? Entering this Pink Elephant Challenge is so much more fun!  For this week's challenge, this site gave us a picture and we had to make a card inspired by the colors in the picture.  I started this card by stamping the cute Duck Dolls from Peachy Keen Stamps.  They were colored with Prisma Color pencils.  I then chose various pieces of cardstock that matched the colors in the challenge picture.  The top and bottom ducks were adhered flat onto the card but I used some pop dots to make the middle duck stand out because she is different than the other two.  On the left side, I attached some flowered felt ribbon.  Originally, I had planned to put it on the right but this just fit better.  Finally, I stamped, "You are just DUCKY!" in Orchid Opulence ink from Stampin' Up.  This card is for my friend Kate.  I hope she likes it along with her other Easter goodies.  (Now I really should get back to work.  Nah!)

Challenge #81 - Best Friends Forever

The challenge this week over at Tiddly Inks was to create a card based on the theme of Best Friends.  Tiddly Inks has digital stamps that you buy and then download.  You can print them as large or as small as you want. 
For this challenge, I decided to use their Masked Avenger.  I think she is just adorable and goes perfectly with how I feel about my best friends.  First I printed her and then colored her using Prisma Color pencils.  I backed the card with some patterned paper from Scenice Route and then added some red cardstock to make her stand out a little bit more.  As you can hopefully see, I added some Stickles to her wand and her cape and tied some red fabric to the knot on her cape to give her some dimension.  The front of the card says, "A best friend is like a super hero..." The inside says, "They are always there to save you."  I hope you enjoy this card and play with some digital stamps today.

Friday, March 16, 2012

Watercolors

 Last night, my mom and I took a class over at Scrap Happy Sisters.  My friend Rhonda taught the class and she is an amazing teacher. She is so helpful and creative. We decorated this box with the pinwheel design on the front.  There is also paper on the sides and back.  Then we created these four cards with watercolors.  They were easy and fun to do.  Take a class from her if you get a chance.

Monday, March 12, 2012

Flowers in Your Hair

 Big flowers seem to be all of the rage to wear in your hair.  Some of my students wear the cutest barrettes and headbands.  Oh, to be 8 again!  I know I have made these barrettes before, but I made a few more for my sister's friend.  First, I cut out a flower shaped pattern out of felt for the base. Then I used two different patterns for each barrette and cut out eight different flowers.  I folded each flower into fourths and used thread to sew them into the middle of the felt flower.  My huge stash of buttons came in handy and I sewed a matching button to the top. The last step was to hot glue a barrette to the back.  These will look cute in a one year old's hair, don't you think?  Have a great week!

Sunday, March 11, 2012

Packers Bunnies

Last year, around Easter, I made these Peep Bunnies in blue and yellow for my family and friends.  (I had to look back at my blog to remember how to make them.)  This year, I decided to take some Packers fabric that I had leftover and make some Packers Bunnies for my friends Kate and Drew.  They live in Wisconsin and their daddy is a huge Packers fan so I thought these would be perfect.  What do you think? Can you see your favorite team like this?  I cut and sewed these by hand so they take a while but give me some time and I can make some for you too.  (There might be a few teams I refuse to do though!!)  Enjoy your Sunday!

Saturday, March 10, 2012

Welcome Austin!

 My friend and co-worker Melinda is expecting Baby Austin to arrive any day now.  I made these gifts for her baby shower.  My traditional wooden frame is always expected at these events and I think if I did not make her one, she might get upset.  I simply covered the frame with paper and inked the edges.  I added a brown ribbon around the outside.  The giraffe was cut using Create a Critter.  His name is from Makin' the Grade and the sun was found on Simply Charmed, I think.  (His room is Noah's Ark so I hope this fits perfectly.)  The card was also made using several size lions from Create a Critter.  I made a card similar to this as a birthday card but I added the baby lion for this.  Baby Austin should arrive this week so I cannot wait to meet him.  Congratulations to Melinda and Patrick!

Sunday, February 19, 2012

Owl Love You!

For Valentine's Day, I made these owls for my students.  I saw the card in a magazine and decided to replicate it.  First I cut out 5 1/2 inch owls using Create a Critter cartridge.  For the girls, I glued flowers for the eyes and buttons for the boys.  I added some beaks and claws.  I stamped the heart in the middle to act as feathers for Valentine's Day.  The final touch was to cut two slits to slide in a pixie stick as a branch.  (Thanks to my mom who finally found pixie sticks at the Dollar Store.)  Simple and very kid friendly!

A Little Stitching

Before I entered this crazy world of scrapbooking, I use to cross stitch - a lot!  So when I found the We R Memory Keepers Sew Easy piercing tool and mat, I realized I could still do both. This is the birthday card I made for my sister.  First, I cut out 2 inch squares and glued them onto a white piece of cardstock to use as a base. Then I used the piercing tool to punch holes between the squares.  I used some black floss to sew in between the squares. Then I glued this to a black card.  I added a rub on "J" and a matching piece of ribbon on the bottom.  This card took a while to make but I love the finished look.

Sunday, January 29, 2012

Birthday Banner

 For my sister Joy's birthday party, I knew I wanted to try and make a banner.  I saw lots of ideas online and decided to stick with what I know and use my Cricut.  I used the George cartridge - my trusty old sidekick.  First, I cut out 5 1/2"  rounded triangles in white.  I inked each one with red. Then I cut out the same triangles in a 5" size using some red papers I had in my stash.  After glueing these together, I cut out "Happy Birthday Joy!" using the George font.  Finally, I stapled each piece to some thick silver ribbon I found at Crown Imports - a store here in Phoenix that carries just about everything.  The banner was HUGE and fit perfectly across my kitchen - although everyone had to duck to get by. 
 I really like how it turned out and it was the perfect touch to a fun night.  Happy Birthday Joy!

Saturday, January 14, 2012

Happy 40th!

It is shocking, but I have many friends turning 40.  How did that happen?  I do not like the doom and gloom of most 40th birthday cards so I made this one a little bit cheery.  My friend loves shoes so I used these embellishments from Meri Meri Accents and then added some number stickers I had in my stash.  No black and doom and gloom here.  Have a great Saturday!