Saturday, October 10, 2015

Fall Is In The Air

Fall is in the air!  Or at least that is what everyone else around the country is telling me.  Here in Phoenix, we are still having 100 degree days.  Normally, the weather does not bother me but everyone else gets to wear sweaters and boots. I miss sweaters and boots.

One thing that makes me really think of fall is apples! Maybe it is a teacher thing, but I love all desserts with apples.  Here is a simple Apple Crisp that you can make tonight (while you wear your boots and sweaters.) Use any kind of apples. Add a scoop of ice cream or whipped cream on top.


Apple Crips (originally from allrecipes.com)
Serves 12

10 cups apples - peeled and sliced (I keep my peels on. I'm too lazy to peel them and I think the peels taste good.)
1 cup white sugar
1 tablespoon all-purpose flour
1 teaspoon ground cinnamon
1/2 cup water

1 cup oats
1 cup all-purpose flour
1 cup packed brown sugar
1/4 teaspoon baking powder
1/4 teaspoon baking soda
1/2 cup butter melted

Preheat oven to 350 degrees.

Place apples in a 9 x 13 inch pan. Mix white sugar, flour, and cinnamon together and sprinkle over apple slices. Pour water on it.

Combine rest of the ingredients. Crumble evenly over the apples.

Bake at 350 degrees for 45 minutes.

Enjoy!


Tuesday, September 15, 2015

Southwestern Sweet Potato

Lots of my married friends think I am so strange for cooking for myself. They think I should eat cereal every night. Really?  Single gals deserve to eat good food too.  So I'm going to share some of my favorite simple recipes. 

How about those nights when you are really hungry but really tired?  Try this Southwestern Sweet Potato.

I did not create this but I remember reading something similar so I had to try it.

Seriously, this is yumminess!

My sister and I went to a Farmer's Market a few weeks back and bought HUGE sweet potatoes.  This is actually half.  (The other half was devoured at last night's dinner.)  To cook this sweet potato, I used my Potato Express.  If you do not own one, go buy one now.  My mom bought it for me and I chuckled, thinking it was silly. Then I used it.  It cooks potatoes in your microwave in minutes.  No heating up the oven!!  And no poking the potato with holes first. Genius!!!

Then I added some black beans.  Simple so far!

And then, now here it gets really good, I piled on some 6 Layer Dip I bought at my local deli.  It includes beans, sour cream, salsa, and cheese.  I just used a few scoops. Hardly any calories and added some creaminess that this dish needed.  (Feel free to just add sour cream or guacamole too.)

Then I topped it with some hot sauce and my favorite herb, cilantro.  Do you have a favorite herb?  My little sister thinks this is such a weird question. She does not believe that everyone has a favorite herb.  Maybe not, but if they did, I hope they would choose cilantro.  Really, I do believe in cilantro.

Now dig in!  It's yummy and will keep you full for hours. 

(And please don't mind the Winnie the Pooh plates.  I plan on replacing everything with Pioneer Woman's collection. Have you seen it?  MUST HAVE IT ALL!)

Happy Eating!

Wednesday, July 8, 2015

Toilet Paper Art

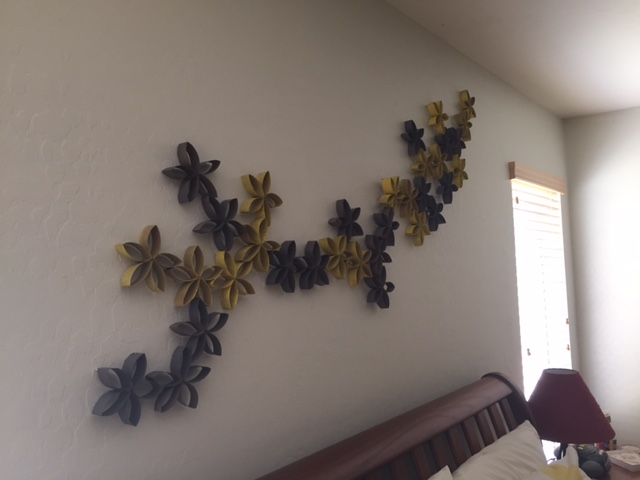
About a year ago, my mom and I started saving toilet paper rolls.  We were going to make something fabulous with them. We even had friends collect them until we got a huge bag.
And then it sat. We could not decide what to do with them.  Then I saw an idea on Pinterest. (Of course!)  I made a new piece of artwork to hang over my bed.  Yes, I said it. Artwork - made out of toilet paper rolls.  Trust me!

First, you need to flatten the rolls with a roller.  (I am sure there is a technical name for this tool but I like roller.)  If there is a lot of toilet paper still stuck to the roll, take the roll and throw it away. You don't have time for picking off little bits of toilet paper. Or convince your children that there is a prize for the cleanest roll.  Whatever works to get them clean.


Flatten the rolls and then cut out 1 inch strips.  I used my paper trimmer and scissors.  You need to cut through the rolls around 6 times to cut clean through but you might still need to trim the pieces with scissors.


Keep cutting until you have lots of petals.  I cut around 40 toilet paper rolls.  This took a while and I worked up a sweat so this counted as my exercise for the day.  Right? 

Then heat up the glue gun. I love glue guns.  They are magic but they are hot so be careful.
Glue five petals together to make a flower.  Just a dab of hot glue will do it.  Put some hot glue on and hold two pieces together for just a few seconds.  Keep adding petals until you have the flower you want.
Isn't this cute?  I also thought this would make adorable butterflies.  Just omit the top petal and add pipe cleaners for antennas.  These would also be great for Christmas poinsettias. 

Back to this project:  Then I spray painted them yellow and gray.  I love how the gray turned out. The yellow, not so much.  I feel like it did not coat the cardboard very well.  I even did a few coats but it just seemed to run off. Maybe it was the type of paint I used?

I let all of my flowers completely dry overnight. This was around 35 flowers.  Then I put them in a bag for a few weeks. Why rush the creative process?  Also, I was so worried that I did all of this work and it would not turn out like I wanted it to. Do you ever feel that way? 

Well, I got up the courage and dumped my bag of flowers on the floor. I laid them out in a design that I thought would work.
Before I could change my mind, I just started gluing them all together. Again, I used hot glue.  It only stuck to the carpet in a few places.  No worries!

Then I grabbed a pencil and placed my flowers on the wall.  I marked where I wanted the holes to be and started pounding nails.  I put one nail in each corner and then added a few more nails where I wanted the flowers to lay on the wall. 

This process might have been easier with a partner to hold it up while I hammered but I did it all by myself.  I am pretty happy with it.  It adds a pop of color and texture to my bedroom.  And, I finally used that bag of toilet paper rolls.
Beckett likes it too! 

Wednesday, July 1, 2015

Chocolate Cake? Maybe?

This might come a shock to some of you, but normally, I do not like chocolate cake.  I prefer vanilla.  I know. I know.  Something might be wrong with me but don't worry, I found a chocolate cake that I love. 

For her birthday, my little sister wanted a peanut butter and chocolate cake. Any peanut butter and chocolate cake.  So, I did a little searching and found this Peanut Butter Cup Overload Cake at:

www.isinginthekitchen.com/2014/08/15/chocolate-peanut-butter-cup-overload-cake-cool-new-music-from-alt-j/


Go there now!!!!  This cake was delicious.  It was one of those cakes where you only need a sliver and you are happy.  Normally, I eat a HUGE piece of cake but that was not necessary with this.  I cannot decide if my favorite part was the peanut butter frosting or the chocolate ganache. I just wanted to take a bite and hold it in my mouth. Forever. And ever.  It was that good.

A few things I did differently than the original.  I made my own buttermilk by adding a tablespoon of lemon juice to a cup of milk. Instead of coffee, I used instant expresso powder and I did not add peanut butter cups to every layer.  I only put them on the top. 

I completely forgot to take a picture of the cake.  (Blog fail!)  But you can take your own picture after you make it. And you should go make it.  Now!

Thursday, June 25, 2015

Cherry Salsa

When summer comes around, so do Bing cherries!  Are you thinking what I am thinking?  Salsa!!  No? Well, you will after you try this Cherry Salsa.

This recipe was originally created by none other than Martha Stewart.  She suggests putting it on tilapia but I also like it on chips and spoons.

What you will need:

2 cups of pitted cherries, chopped up (I cut it into fourths because I like it chunky)
1/2 of a red onion, diced
1 jalapeno, seeded and diced
About 3 tablespoons of cilantro (about 1/3 of the bunch you buy at the store)
lime juice (original recipe suggests 1 tablespoon but I use the whole lime)
Salt, pepper

Before you begin, go out and splurge on a cherry pitter. Seriously, you can remove the pits by yourself but your fingers will be stained cherry red for the rest of the summer. This might sound cool, but it is not.

Then cut up everything and mix it all in a large bowl.  I like to make it the night before to let all of the ingredients really mix well together. 

A few tips:  To cut up the cilantro, grab the bunch and scrape your knife against the stem.  The leaves will come right off for you. (Thanks to Ina Garten for this tip.)

Always handle jalapenos with baggies on your hands.  Then you will not get jalapeno juice in your eyes. 

Maybe I should go taste test this now? Enjoy!

Wednesday, June 24, 2015

Burlap Earring Holder

Summertime, in the life of a teacher, means doing lots of home improvement projects that I never have time for during the school year.  Thanks to Pinterest, my list is growing by the minute. 

A few weeks ago, I saw an idea to make this earring holder.  My earrings have spent their time in a jumbled mess in a drawer.  I cannot tell you how many mornings I have found one earring only to never find the matching earring because it is lost in the abyss. There has to be a better way, right?  Pinterest to the rescue!  I found the original directions here:  www.pinchyourpennies.com/diy-jewelry-holder.

Here is my final project:


Here is how I did this: First, I went to Goodwill and bought this frame.  (Did you know people stand in line for Goodwill to open? Even in the heat of the summer.  I had no idea.)  I chose this frame because it was the right size that I was looking for and I thought I could easily remove the glass. And it was only $2.99.
 
 
On the way home, I also stopped at JoAnn's.  I bought burlap, spray paint, and spray adhesive.  Then I put everything on my kitchen table and let it all sit for a few weeks.  Why rush things? 
 
When I finally got the itch to get started, I removed the glass.  It turned out to be two pieces.  I should have saved them to make something else, but I threw them away.  I also found a smaller frame inside that I could use to attach the burlap.  I took it outside and sanded off most of the black.  It came off easily.

 
Then I brushed it off so that there were no little pieces of grit or powder. Now for the fun part. I got out the spray paint.


I chose this brand because it said it adheres to everything and it did, kind of.  I found it covered the top really well but it slid off of the sides.  My knowledge of spray paint is not very good so I have no idea what kind I should have used. (If you have suggestions, I would love to hear it!)  I ended up spraying on three coats and then let it sit over night.  (After about an hour, I moved it to a new piece of newspaper so it would not stick to the frame.)
 
The next day, I glued on the burlap to the smaller inside frame.  A huge word of advice:  buy repositionable adhesive!  I learned this the hard way.  I glued my piece of burlap to the smaller frame and then placed it inside the larger frame using the screws on the frame to hold it in place.  My burlap is VERY bulky and is much TOO big but, you know what, I finally finished this project and I'm just going to live with it. 
 
Finally, I hung all of my earrings on the burlap.  The only earrings that do not fit are my hoops.  One thing I realized, after this was hung on the wall, is that I am going to have to take this down EVERY time I want to wear earrings.  This might be a wall hanging that never hangs on the wall.
 
My earrings are now organized and I got a summer project done.  Hooray for me!
 
Till next time!

Let's Try This Again!

Wow!  It has been a few years since I posted here.  I felt like I had nothing to share since I was not being creative every day.  Now I realize that this blog does not have to be about scrapbooking or crafts only.  I can share all of my likes (and dislikes) with you.  So stay tuned for a new and improved Flutterby DesignsAZ!