Saturday, December 24, 2011

Thank You Holly!

My dad had heart surgery last week so much of our time was spent in the hospital for the past few weeks.  Not a great place to get crafty!  After he got home, we wanted to thank everyone who helped us so I took a Christmas card idea and turned it into this thank you note.  I cut out the holly leaves (wink, wink) at 3 1/4" from the Joys of the Season cartridge.  Then I used the Ultra Embossing powder on the leaves to make it look wet.  I added the three buttons for the berries.  Finally I took a red pen and a ruler to make the border and added "thank you."  We are so thankful to the nurses, doctors, staff, and our friends and family for helping us out.  Merry Christmas everyone!

Sunday, December 4, 2011

Whoo's One?

For the past few weeks, I have been struggling with making my Christmas cards.  I just have no ideas and no inspiration. They are done, but I do not love them and they will probably never show up on my blog.
Then this morning, I had to make a birthday card for Dylan's one year old birthday. The theme was Owls.  I used the Create a Critter cartridge and actually got this card idea from the front of the cartridge book.  I love how it turned out.  I covered the white card with different solid papers and folded the card to give it more dimension.  After finishing the owl, I added the tree branch and leaves to the inside.  Now why couldn't my Christmas cards have been this easy and cute?
Have a great week!

Saturday, November 12, 2011

With Sympathy

When I logged into my blog tonight, I realize I have not posted in a long time.  November is just flying by!  Another thing I realized is that I have had to make too many condolence cards recently.  These are always hard to make because I am not sure what images to use.  I found this simple bird in the Pink Journey cartridge.  Most of the images are for breast cancer awareness and the 3 day walk but this bird seems to fit sympathy and condolence perfectly.  Hope I do not have to make many more of these this month.

Tuesday, October 11, 2011

Wedding with a Swirl

For our friends' wedding, I did not want to create the typical wedding card of bells and hearts.  There is nothing wrong with those, but Holli and Ryan deserved something different and unique.  (I got this idea while looking at the wedding cards at Target.)  First, I covered the card with some green Basic Grey paper because the wedding was in October and I wanted fall colors. Then I cut out the green swirl using Storybook.  I covered the swirl in clear embossing powder and heated it to give it some shine and texture.  After adhering it to the paper, I added the rhinestones and the quote that says, "to have and to hold . . ."  On the inside, I continued the same colors and finished it with, "from this day forward."  I usually am a stickler for capital letters, but the lowercase letters seemed to fit this card perfectly.  I hope their marriage is as wonderful as their wedding was.  Congratulations Holli and Ryan!

Sunday, October 2, 2011

Metal Signs


I found this cute and spooky sign idea from Authentique Papers.  Start with a Metal Decor sign from Michael's.  It is part of their Celebrate It line and I found these near the wooden frames section.  I then layered two pieces of cardstock.  These are all just extra Halloween papers I have collected over the years and never used.  (The original idea used their own line of papers that I think looked great on their site.)  I used a foam brush and painted the edges black.  While those dried, I tied some black wire ribbon into bows at the top.  Then I used the We R Memory Keepers paper piercer to punch holes around all four sides of the papers to give them a little more texture.  I glued this to the middle of the signs.  Then I tied some various Halloween ribbons to the bottom half of the signs.  Using my Cricut, I cut out some orange tags and addeed some Soft Spoken embellishments from Me & My Big Ideas.  I love how these turned out because I used so many Halloween pieces I have had for years and never knew what to do with.  Think of the what you can make with your Halloween stash!


Sunday, September 25, 2011

Flowers and Pumpkins

This week has been rough so I decided I needed to do be crafty and create some new fall decorations.  I do not remember where I saw this idea, but I loved it.  First, you take a foam or craft pumpkin and cut a 4 inch circle out of the top.  It reminded me of carving a real pumpkin and taking the stem off. Then you cut the stems of various fall flowers and fill the hole you just cut out.  I recommend using some wire cutters to cut the stems to the length you want.  (I just bent the wires back and forth until they broke.)  Move the flowers around until they look just right.  And you are done.  Now you have some cute centerpieces perfect for Halloween or Thanksgiving.  (Michael's has all of these supplies on sale right now!)  My mom thinks I should take these to my classroom - my third graders will love them.  Enjoy!

Sunday, September 18, 2011

Stylin'

Happy Football Day to everyone!  Here is a quick birthdy card I made for a coworker last week. She always wears the best clothes so I used the Paisley cartridge to cut out this shoe and the matching word.  After adding the layers, I added some pink glitter to to the middle of the flower.  Looks like it might just walk off of the page!

Sunday, August 21, 2011

Something Splendid


Since the school year has started, I have not been able to do much creative stuff.  Thank goodness for Something Splendid and these felt cupcakes.  This was an online class that came with a kit by Elizabeth Kartchner.  Each cupcake had its own video and step by step directions.  All it required was some hand stitching and a hot glue gun.  If I can do it, you can too!  Head on over to this site for their upcoming classes.  I am thinking about making a bunch of these for Christmas gifts.  What do you think?

Saturday, July 30, 2011

Goodbye July!

 To celebrate this last weekend in July, here are a few patriotic cards I made.  The images are digital stamps from Tiddly Inks that I printed and colored with my colored pencils.  I layered them with some red, white, and blue paper I had.  The words are all rub-ons that I first put on white cardstock and then stuck onto the card using pop-dots.  The girl also has some ribbon.  Slow down summer - you are going too fast! Enjoy your weekend!

Thursday, July 21, 2011

Bee Mine

It's never too early to think about Valentine's Day or school parties.  This is a black clip bought from Office Max.  I cut out the bee and the heart from the Create a Critter catridge and then layered them on the front of the clip.  Then I printed out "Bee Mine" and the name from my computer and layered those with matching paper. The saying at the bottom is attached with pop dots and the name at the top is removable so you can add notes or any other sentiment you might want.  This would be so cute sitting on a desk.

Tuesday, July 19, 2011

Tweetheart

The inspiration for this project was to create something for Valentine's Day that used blue as it's main color.  I used some blue paper and covered a small clipboard. Then I used my Cricut machine to cut out the blue bird, the "tweet" and the hearts.  I layered them all together and added a button on the bird and a flower with an extra button on the top.  The very top of the clipboard is covered with some ribbon.  Maybe I will save this for my tweetheart!

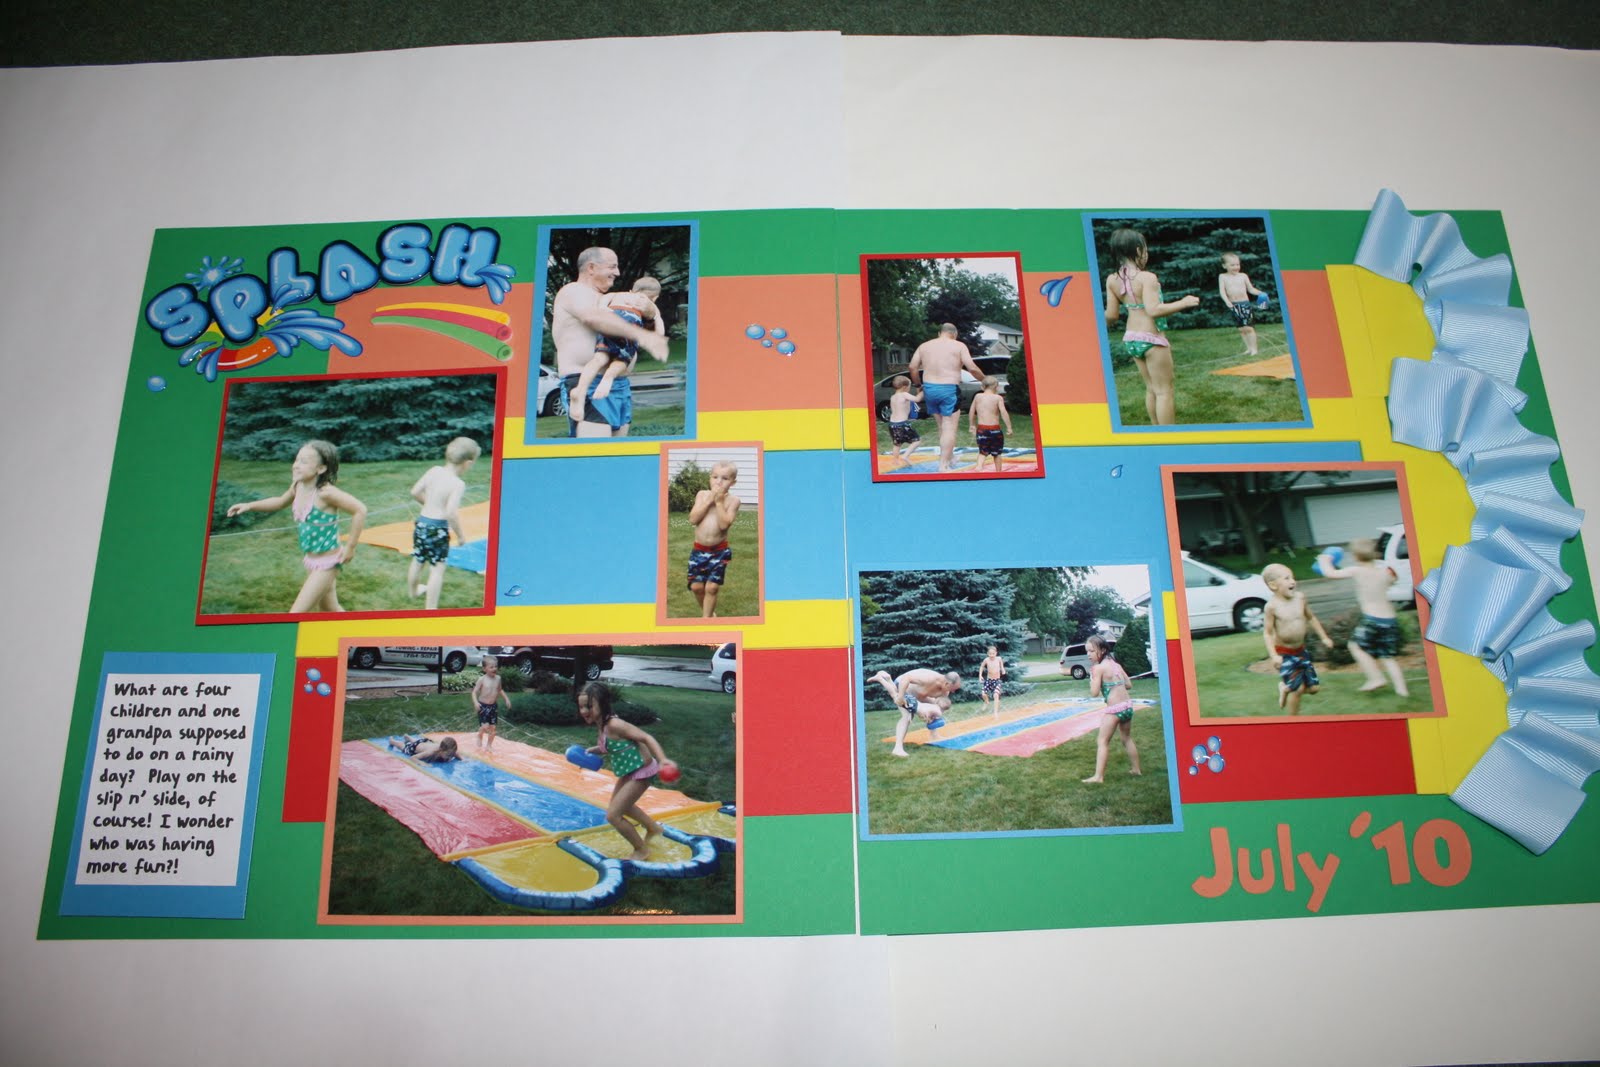
Thursday, July 14, 2011

Splash!

 
 Lately I have been submitting a lot of projects to magazines for publication.  No takers yet!  Here is one I created with some photos from last summer.  I wanted to recreate the water slide on  my pages, so I used some foam board and ribbon going across both pages.  There were lots of photos so I cropped my favorites in different sizes and backed them with the same colors as the water slide.  The "SPLASH" is a giant sticker and I cut out the date with my Cricut using the Mickey Font.  The final touch was some journaling in the corner.  Makes me want to dive right in!


Monday, June 27, 2011

Happy Birthday Cupcake!

Happy Birthday to my little sister!   Her big day was yesterday so I made her this cupcake card.  I made a standard square card with some glittery paper.  Then I used a clear stamp set from Hero Arts called "It's a Day for a Cupcake."  I stamped the cupcake liner on blue cardstock and then scored the lines to make them stand out a little bit more. Then I stamped the frosting twice on some pink paper.  I glued the liner down with pop dots and glued one copy of the frosting above it.  Then I cut apart the three layers.  On the bottom layer, I added some Queen & Company Beadifuls with some 3 in 1 glue.  On the middle layer, I colored in the sprinkles with a hot pink marker and I left the top layer alone.  I added these to the card with some pop dots.  Every cupcake needs a topper so I used a bright pink button.  The saying at the bottom is from the same stamp set which I layered over some ribbon.  Don't you want to take a bite?!  Enjoy your Monday!

Thursday, June 23, 2011

Jamie's 40!

 My good friend Jamie turned 40 a few weeks ago.  He and his family are waiting to have his party until I can go back to Wisconsin and visit next weekend.  (Yeah for me!) 
Since his party will be on the beach by the river, I wanted to make some party decorations that were both perfect for the water and perfect for a 40th birthday party.  I used the H2O Cricut cartridge for everything.  I cut out some party decorations including the sun, sand pail, and wooden sign at 11" using Black Tie cardstock.  Then I printed out the saying and backed it with Ruby Slipper cardstock.  The font is Snap ITC.  The smaller suns are cupcake toppers.  I found a circle template for Microsoft Word.  (Let me know if you want this.)  Then I printed out the saying and cut out 2" circles.  I backed these with 2 1/4" circles using the same Cricut cartridge.  Finally, I backed those with some 3" suns.  The stick is a 4" candy stick that I hot glued to the back. These will look great with the sun and the sand.  More pictures to follow!  Enjoy the rest of your week!


Friday, June 17, 2011

Ahoy Dad!

My dad loves all of the "Pirates of the Caribbean" movies so I made him a Pirate Father's Day card.  I used a digital stamp from Tiddly Inks. The greatest thing about digital stamps is that you can use them again and again and you can change the size of them.  Just print them like you would print a picture.  After printing him out, I colored the pirate with pencils and then layered some different cardstocks.  In the corners, I used some blue brads along with red metal arrows that I had from a Valentine's Day kit.  The final touch was to stamp "AHOY."  I hope my dad has a great Father's Day and I hope all of your dads do too!

Friday, June 10, 2011

Beach Time

Happy Friday everyone!  Doesn't this heat make you want to jump in the water, any water?  Me too!  This card makes me think of sand and water.  I used a basic white card and embossed a light blue piece of cardstock using the Cuttlebug.  (Thanks Mom for letting me play with this!)  Then I cut out some different shapes using Accent Essentials in different patterned papers.  The girl is Cheeky Beach from the Greeting Farm.  She was colored using my Prismacolor pencils.  After attaching the sun and circle of sand with Cheeky, I knew the left side needed something so I layered two different blue ribbons.  I cut out another circle of the sand paper. Then I used the Tempting Turquoise ink from Stampin' Up with a simple quote that would fit any day.  I gave this as a birthday card.  Enjoy!

Tuesday, June 7, 2011

Royal Challenge - Fairy Tale Fun

Oh to live in a fairy tale! Where good always beats evil and everyone lives happily ever after! The challenge this week was to create a card inspired by a fairy tale or a prince or princess.  Hmm?  A prince?  Edward seems to fit this description, in a very modern way of course!  I made the card from black cardstock by cutting out two 5" crowns from Alphalicious.  There is another strip of black cardstock that I folded in half and glued to each piece to make them into a card.  Edward is colored using Prismacolor pencils.  His crown is some glitter paper cut into a 1" crown from Alphalicious.  I searched the internet for quotes about princes and this is what I came up with, "Every girl wants her Prince Charming."  I printed this on my computer and backed it with more glitter paper.  I attached some black and white ribbon to the front and added everything to the top of the ribbon.  Now, I can just sit and wait for my Prince Charming to knock at my door!

Monday, June 6, 2011

Which One Wednesday - Red

Red is my favorite color so it was an obvious choice for the Which One Wednesday Challenge. The challenge was to make a card using one color.  This turned out to be harder than I thought.  I started with Cheeky Rockabilly because she is so fun and sassy.  She is colored and blended with Prismacolor pencils.  (Notice the shades of red in her hair.)  Then I tried about three different layouts until I found one I wanted to use.  I wanted to add lots of texture since the color was the same. First, I layered two shades of red and I embossed the word, "THANKS" in another shade of red.  I put the embossed word on top of two flowers.  I used pop dots to make the girl stand out.  Then I added the rick rack red ribbon at the bottom.  For an added touch, I placed three red heart brads on the left.  Wouldn't this card be fun as a bright thank you?

Saturday, May 28, 2011

High School Graduation


This past week has been full of graduations and celebrations.  The first graduation I went to was for my former 3rd grade student, Monique, who is now a high school graduate.  She graduated top of her class.  I am sure something from 3rd grade must have stuck. 
I used a sketch for these cards from Mystery Mondays on The Greeting Farm - Farm Fresh Challenge.  For her card, I used the girl from "A Little Dreamer" by The Greeting Farm.  The papers were some Daisy D which I had for a while.  (I must admit, purple is not my favorite, but it is the colors of her school so I went with it.)
The second card was for Ryan, our neighbor whom I have known his whole like.  For his card, I used the little boy from the same stamp set.  I colored them both with Prisma pencils that I blended.  His papers were from Scenic Route.  The colors also matched his high school, my former alma mater too!  Hope your weekend is also full of celebrations, no matter how big or small they might be!

Tuesday, May 24, 2011

Happy Graduation

 This is the week of graduations for me.  Here is a gift I made for a fellow teacher's daughter.  Now granted, she only graduated from 8th grade, but I still wanted to do something. 
The picture frame is a basic wooden frame that I covered with paper.  I inked the edges in brown.  Then I added the flower with a brown brad in one corner and layered the word "Together" with brown and green in the other corner.  The word was cut from Graphically Speaking. 
The card is a basic square card that I again covered in similar green paper.  I cut the word "original" from the same Graphically Speaking cartridge.  The stamp is Ebony from The Greeting
Farm.  (She is so cute and tough at the same time.)Then I had some extra rhinestones that I tried to make an arrow out of to point to the girl.  What graduation gifts are you working on this week?

Friday, May 20, 2011

Pancakes


Do you need lots of gifts in a hurry? Why not try these?  I bought canning jars from Michael's and filled them with 2 cups of pancake mix.  I glued some paper to each lid and shut them tight. Then I made tags and used a Maya Road stamp called Smarty Owl.  (If you don't like the owl, you can remove him and put your own image.)  I colored him in with some markers.  Then I wrote some quick directions on the tag with a note on the back.  I stapled some ribbon and tied each tag to the jars with twine.  Now they have a gift they can use and fill again.

Sunday, May 15, 2011

More Thank You Notes

Our PTA President has done a lot for us this year so I made her this Thank You card and the teachers all donated money to buy her a massage gift card.  The papers and most of the embellishments were from the Dear Lizzy line at American Crafts.  I love the colors. The products are simple but colorful.  The basic card design was from A Card A Day by PaperCrafts magazine.  Sometimes I get stuck and cannot think of an idea, so this book has cards for everyday of the year.  I chose one of their ideas and made it my own. 

Wednesday, May 11, 2011

Thank Ewe

It is no secret that I think Thank You cards are so very important.  I was taught that when someone does something nice for you or buys you something, you write them a thank you note.  This has become a lost art so to speak.  Well, as a teacher, it is my responsibility to teach manners to my students so whenever they give me something, I write them a note.  For Teacher Appreciation Week, I received lots of goodies.  I made these "Thank Ewe" notes for each of my students.  The lamb is a stamp from Sandylion.  I wrapped some green eyelash yarn around the bottom of the card to make grass.  Then I glued on the lamb and stamped "Thank Ewe."  My students were happy to find them on their desks.  (I have to warn you though - my 8 and 9 year old boys proceded to tear off the yarn and put it in their hair to make green hair for the day.  I had to turn away.)  It's the thought that counts, right?!

Monday, May 9, 2011

Happy Mother's Day

I know Mother's Day was yesterday but I was busy with my wonderful mom.  Here is the card I made for her.  I got the idea from PaperCrafts magazine.  All of the paper I used was from the Dear Lizzy collection by American Crafts.  I have had these supplies for a while and finally decided to use them.  First, I made the base of the card. Then I cut out many different size flowers with the Accent Essentials cartridge.  The button on each flower is also from the Dear Lizzy line.  They have just a touch of shimmer to them.  I glued the flowers over the top of some leaves in random places.  I drew the lines of the flowers and then printed out "Happy Mother's Day" and attached it with some pop dots.  Now my mom has a bouquet of flowers she can keep for a long time.  My mom is the best and I hope she enjoyed her weekend! Enjoy your week!

Wednesday, April 27, 2011

Last of the Bunnies


Here are a couple more cards using Easter Anya from The Greeting Farm. I hope you like them.  And I hope you enjoyed your Easter weekend with your family and friends.

Sunday, April 24, 2011

Happy Easter to my Peeps!

Like most people at this time of year, I love Peeps marshmallows.  So, when I saw this project at Dandelions and Lace , I knew I had to give it a try.  My first Peep was made using my sewing machine.  He did not turn out so well - those ears are tricky so he is now in "a better place."  These were all sewn together by hand, which took a lot longer but they are so cute.  Imagine a basket full of these on Easter morning.  Cute without the calories!  Happy Easter to all of you and thanks for your continued support!

Saturday, April 23, 2011

Hoppy Easter

This Easter card was made using the Easter Anya stamp from The Greeting Farm.  I colored her with pencils and then added some fluff to the eggs in her basket.  I printed out the saying from my computer and layered some ribbon.  I think she might hop off the page.

Friday, April 22, 2011

Chicks

Just a quick Easter card.  (Sorry the pic is so bad, I took it at night before I mailed it.) The chicks are from Sandylion Clear Stamps.  I edged them with some Martha Stewart fluff.  The grass is some ribbon that I cut and glued down with tacky tape.  Then I cut out the saying with Simply Charmed.  A few more days to go!  I have some bunnies to go sew.  Stay tuned!

Wednesday, April 20, 2011

Disney Wedding

This picture is not the greatest, but this was a wedding shower card for a friend who goes to Disneyland a lot.  I cut out the two Mickey and Minnie heads using the Mickey Font.  (Minnie has a purple bow because that was the main wedding color.) To make the veil, I folded a small doilie and glued it behind the bow.  If I had to do this card over, I would have added a different background color so you could see the veil better.  The bow on the bottom was to add some more texture to the card.  Wedded Bliss! 

Monday, April 18, 2011

Personalized Disney Albums

 It is that time of year again when it seems like everyone is planning a Disney trip.  Don't forget an autograph book for your favorite characters to sign!
Last summer, I made a few of these for some friends so I used the same dimensions as before.  I made these using the Mickey Font and the Mickey and Friends font.  They are super easy to make, but better yet, order one from me.  Let me know what name you want on the book and what character you want too!  I leave lots of extra pages for pictures too!